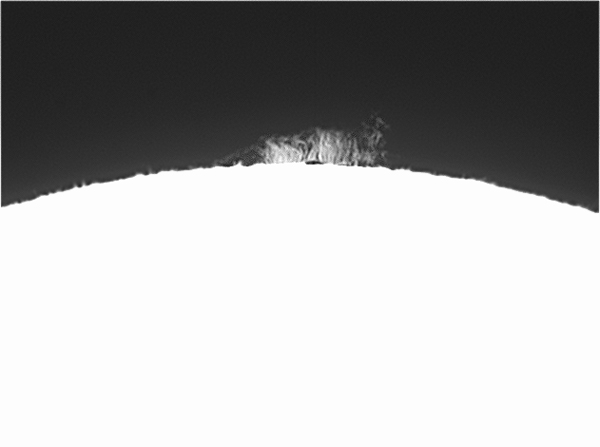
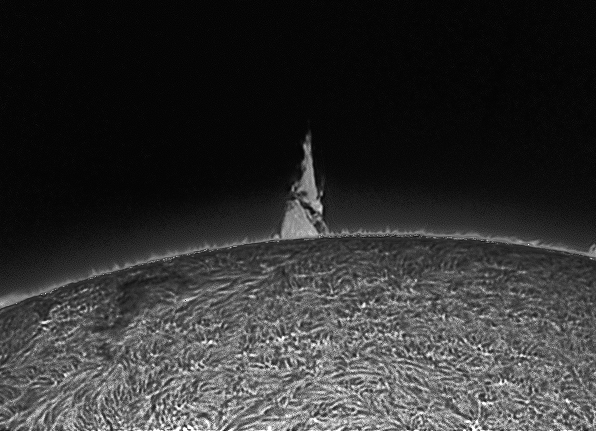
This is one of the most beautiful views i have of the Sun.. Two prominences are there at the limb and today, these are the best at the Sun.
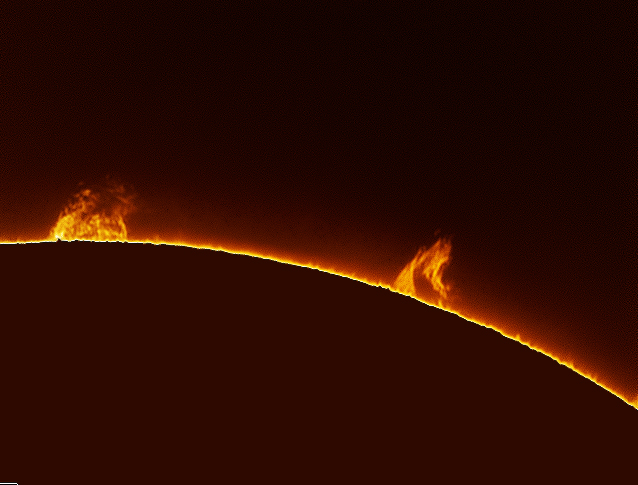
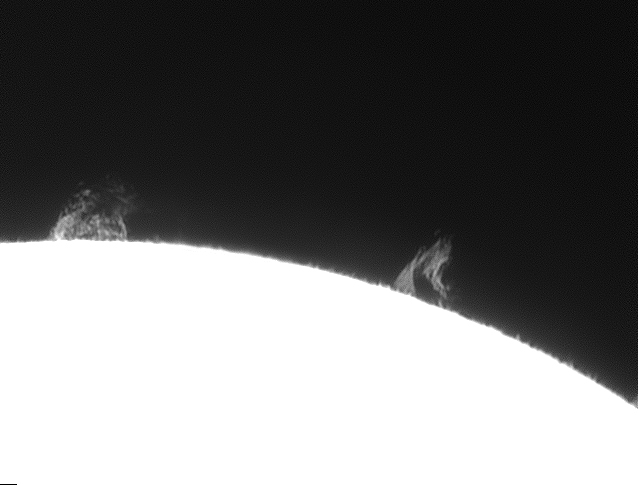

This is one of the most beautiful views i have of the Sun.. Two prominences are there at the limb and today, these are the best at the Sun.
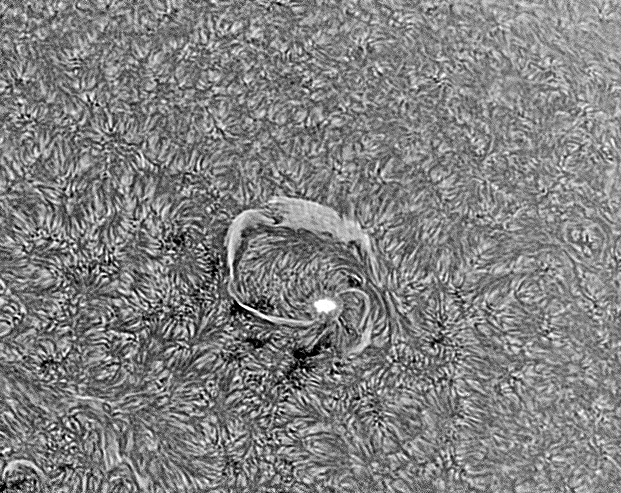
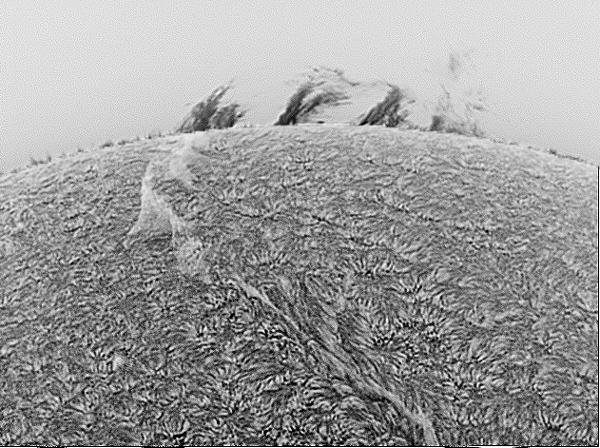
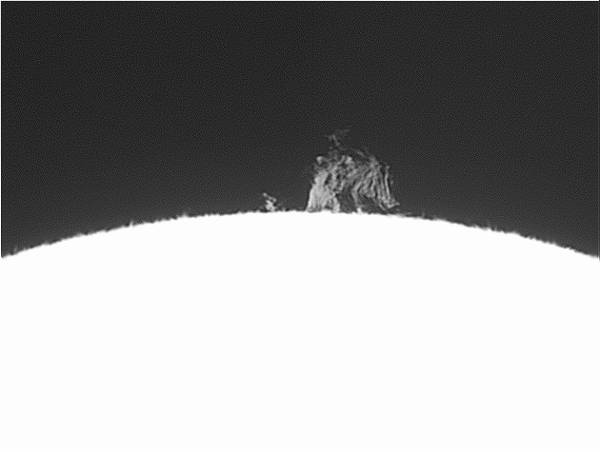
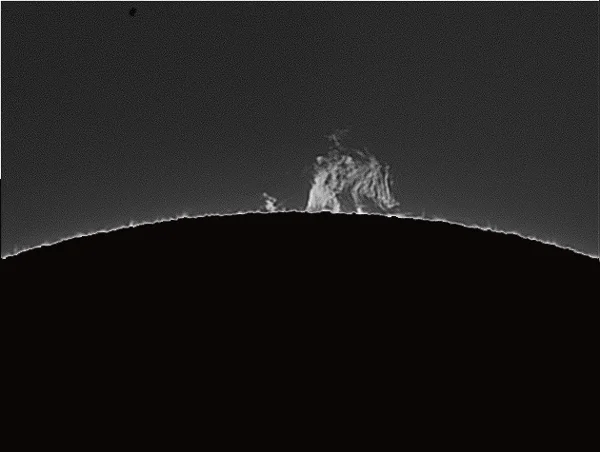
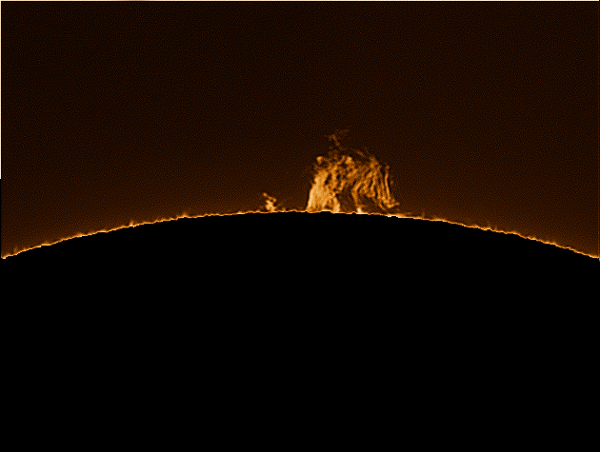
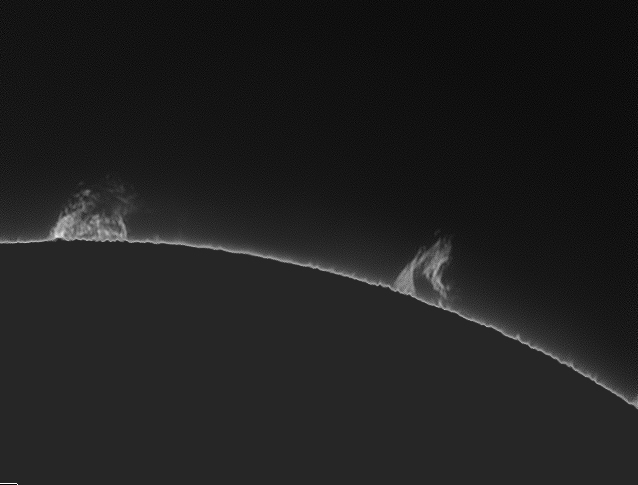
Here is the 'solar prominence' seen on the surface of the sun.. A small sunspot is there as well. Three different processing techniques to identify more detail.
Lets start with an original image, no cropping no scaling. Below is the stack of 5 images (this is to keep the noise a bit down) from the raw AVI file i captured with an Imaging Source camera, DMK21. Posting this image on the web will change the actual size of the image but the original image is 640 * 480 pixels in size.
First we need to find the Imaging Scale of my setup. I am using Lunt 60 telescope which has an aperture of, you guessed it, 60mm. Next the focal length of this telescope is 500 mm. Dividing both numbers give us the f/ratio of 500/60= 8.33
I am also using a 2.5X barlow lens from televue (one of the best barlow lenses i have ever used). Now lets use this number.. but how?
Astronomy should be fun for those as well who hate maths! (I don't actually hate maths but would love to be lazy enough to allow a calculator doing all the hard work for me). So putting the numbers in CCD Calc, i see focal length becomes 1245 mm and f/ratio is gone at 21.
Each pixel in DMK21 has a measurement of 5.6 micro meter and this gives me an image scale of 0.93 arcsec/pixel. This means that every pixel on my chip is seeing 0.93 arcsecond of the sky (which is very very tiny, Our Sun or Moon you see in the sky is about 1,800 arcseconds is size).
Now i need to find out the area being covered in 0.93 arcseconds. This is also not difficult at all. One of the first formula astronomy students learn is called the small angle formula. This allows to calculate the original height of an object, if we know the angular size of the object and the distance between the observer and the object is known.
I used StarryNight software to see the distance the sun had yesterday at the time of imaging, which was 1.016391237 Astronomical Unit. This corresponds to 1.52049965*10^11 meters. So using the small angle formula, with my setup, 0.93 arecsecond here in this image is equal to 685 km!
To find the angular size of the whole prominence, i used Photoshop to count the pixels, see below:
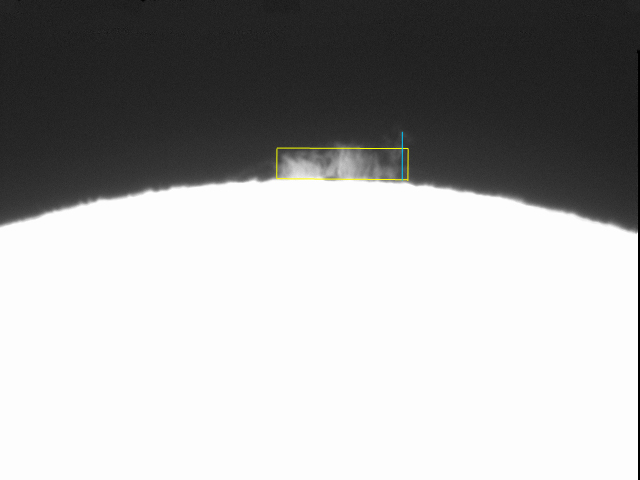
I have marked the prominence in the yellow box to count the height and width of the whole area. On the right is a higher prominence which is marked with blue. After counting the pixels and multiplying it with per pixel area, here are the result.

The height of the highest point on earth is of Mount Everest, which is less than 9 km. Now you can see the highest part (right) of this prominence is more than three thousand and five hundred times of the height of Mount Everest! Imagine standing at the base of this prominence (lets call it a mountain of rising fire) and watching it rise that high in the sky.
The width is about 90,000 km.. this is more than double the length of the distance you would make if you travel the whole planet Earth through the equator.
Now look again on the top image.. how humble and small this prominence looks.. yes, looks can be deceptive.
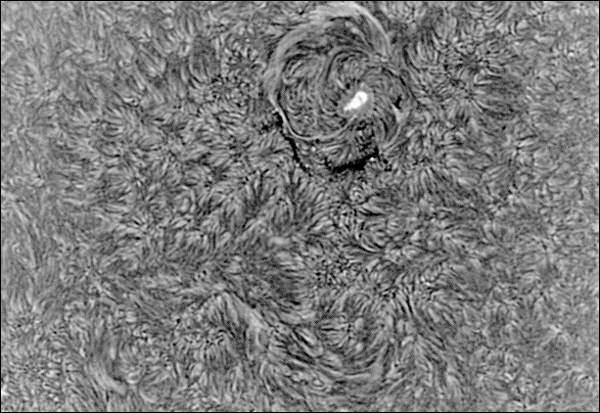
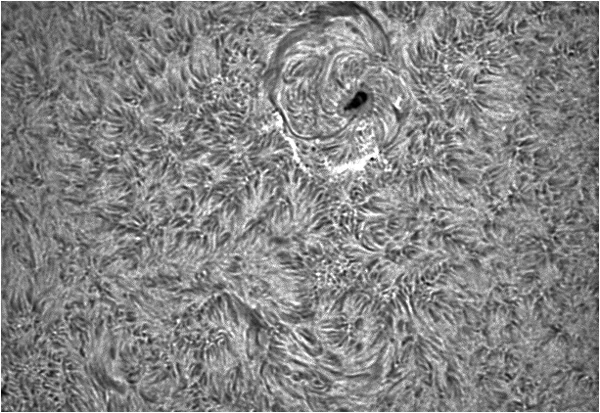
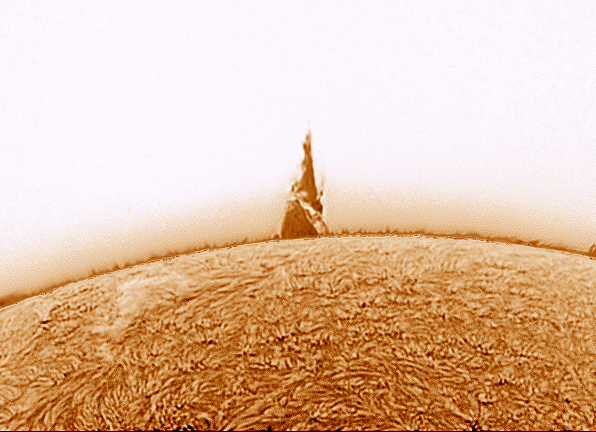
and here is a beautiful prominence making a loop on the solar disk.. again with variations of image processing. There is nothing else interesting on the disk currently.
Off i go.. with my new toys, i would like to keep myself busy so here is the first result, a solar prominence. There were very few proms around the solar disk and this i found out to be the best to start off my imaging tests with the new mount. Above are the three flavors of my processing routine. If i could get a hold of it, and the mount proved to have a really good tracking then i will also attempt animation of the proms which i used to do with my previous Losmandy Titan Mount.
Celestron introduced their latest mount in January this year. The VX Mount is very light weight, portable and specially designed for imaging. It can track well past the meridian, has permanent PEC correction and with high torque motors it can handle some weight imbalances.
I bought this mount for its portability, light weight, very quick assembly and only for Lunt solar telescope. I received it in March and when setting it up for the first time, made a terrible mistake. With all my 'expert' confidence i attached the Dec cable in Aux port and... smoked the mount! The board was burnt in many places.
I had to sent it back to Celestron in USA. It took them a month to send it back. What they did was amazing indeed.. they replaced the faulty mount head with a brand new one and charged me absolutely nothing!
I have also got their Power Tank for portable power supply. I know Maroof will love it.
So now i am all ready for solar imaging.. Solar surface is changing all the time and i will make sure to capture it 'all' the time!
This video not only has a beautiful view but also shows a very common phenomenon knows as 'twinkling' (Try HD viewing here). This is very well known with the stars we see in the night sky but this video is showing the street lights twinkling as well. The further they are the stronger is the effect.
So what is twinkling anyway.. my Oxford dictionary of Astronomy defines it this way:
The rapid fluctuations in brightness of stars, more properly known as scintillation. Twinkling is caused by atmospheric turbulence distorting the incoming wavefront from a star. Twinkling is less noticeable in planets, which have an extended area. Excessive twinkling is a sign of bad seeing.
A light ray not only changes its speed but it also bends its path when it moves from one medium to a different medium, which have different densities. The vertical rising air and the fast moving horizontal air in the atmosphere are constantly creating different pockets of various densities. Which in turns varies the refractive indices of different regions in the air. Here when and where the wavefront is convex, the light rays converge and where the wavefront is concave, the rays diverge. This concentrates and de-concentrates the energy of the wave in certain patches. Twinkling is born.
These changes begins in the high layers of earth's atmosphere and extends all the way down to the earth or inside your telescope tube and even on the surface of the mirror or lens.
So to keep the observatories more thermally balanced they now have windows like features in the domes' walls which are opened when needed. In my observatory, which has a roll off roof structure, i have tried various ways to make seeing as good as i can. Since it is on the roof top of my house which has bricks all over, in hot season, i sprinkle water on the roof when the sun goes down. In about two hours when i am ready to image, the evaporating water has already taken a lot of heat from the brick roof.
I have also tried multiple times to turn on a pedestal fan at various speeds in my observatory in the hope of getting the convection layers as low as possible but honestly i have not noticed any difference in my seeing, perhaps the structure of my observatory does not allow convection currents in the air to minimize this way. The other problem is the mount, at these high wind speeds and such a long focal lengths the mount does shake and the image degrades so the fan is not helpful for me.
Adaptive optics technology in the professional observatories helps a lot in minimizing the bad seeing.. these 'rubber optics' which can adjust according to the incoming wavefront are one of the key technological marvel that astronomers can really feel proud to have. Though my SBIG AO-8 is marketed as adaptive optics but in reality it does not have a bending optical instrument, rather it has a lens that can move on two axis at quite high speeds. It actually is a good guider than a bad seeing corrector device.
Coming back to this video, the far off street lights are traveling such a long distance that the varying densities of air, caused by the movement of hot air, are making them twinkle. The nearest lights are much less effected and show quite a stable sources of lights.. great view!
Today, two separate files were recorded, one for dim prominences and the other for bright solar disk. Among 7,000 frames, 1,500 were selected, aligned and stacked in AviStack; sharpened in Registax and combined and processed in Photoshop CS5.

I saw an option on squarespace which can be used to add twitter posts at my website. So i have added a page for my tweets here. I will be posting about my thoughts and activities in and out of my observatory but mainly for my telescopic observation and imaging. You can follow me here what i am upto with my equipment, my failures and my successes.
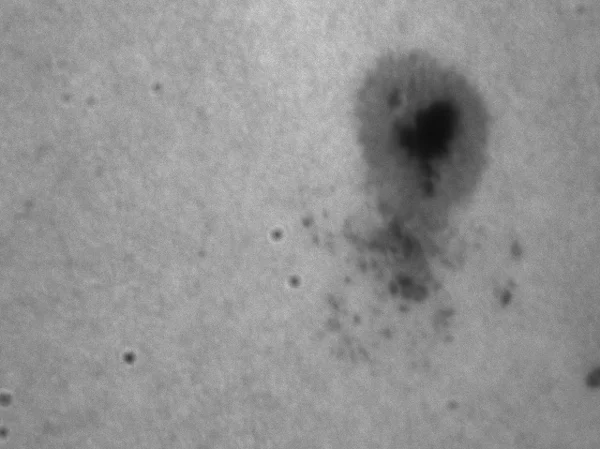
There are three active sunspot region on the sun. Solar & Heliospheric Observatory (SOHO) is showing the following image right now:

Solar disk with sunspots (SOHO website)
I have got AVIs of all these three regions but the most interesting is 1598; it has a complex structure and is quite a big one. when compared with our earthly standards. Following are the images from my processing run or lets just say, "image ladder" AVI file contains many hundreds or thousands of images. Seeing allows both worst and good views to pass through the atmosphere. The image on right is the worst image in the AVI and on the left (traces of granulation) is the sharpest one.
And here is the comparison with our planet.. now you can truly see how big is this region when earth is put to scale here:

Just got some videos from Imaging Source DMK21 camera and processed them.. This is happening on Sun today.
Shifting the monster is never easy.. and this is the only reason why i 'want' to avoid public sessions with my C14 and Titan mount but could never avoid to avoid this want.
An off day provided the opportunity to put back everything where it truly belongs.. i still have to figure out some cables issues and want to put back the main CCD setup at the telescope.
After attaching Lunt halpha telescope with the C14 OTA, i got a quick look at the sun.. and immediately saw a huge prominence where the arc was attached to the solar surface on both sides. I thought i must image it. So i installed imaging source DMK21 camera with this scope and carefully tuned the pressure tuner and focuser and quickly grabbed a few movies. Here are the results.. not bad!


So Thandiani was great.. so many people joined us from three different cities: Lahore, Islamabad and Abbottabad. I, on the behalf of Lahore Astronomical Society, am very thankful for those crazies who drove all the way up to the 9,000 feet high peak.
It is always nice to be up there.. i think i have been going there for fifteen years now and the main reason is that Thandiani has extremely raw night skies and it has a great scenic beauty; plus for us 'land dwellers', mountains always have very pleasant weather. The above shot is the morning view from my mobile camera, just a few yard away where we were staying.
Though we were struck by the astronomers' nightmare (clouds and a bit of rain), the sky did allow us to set our telescopes and watch clusters, binary stars and planets. Milkyway is always one of the best treats a good night sky can offer us.
I enjoyed meeting my old astro pal Saif Sahib from Islamabad and my new friend Asadullah from Abbottabad. We had a lot of time for our heavenly and earthly talks and everything in between.
I so wanted to image from Thandiani but this time clouds won.. Also, this time i did notice a considerable decline in the quality of night sky there.. It seems the nearby city Abbottabad is growing fast and in a few years we will definitely loose the advantage of a light pollution sky at Thandiani.
Thank you again everyone who came for our two nights observation session at the mountains.. more trips coming up..
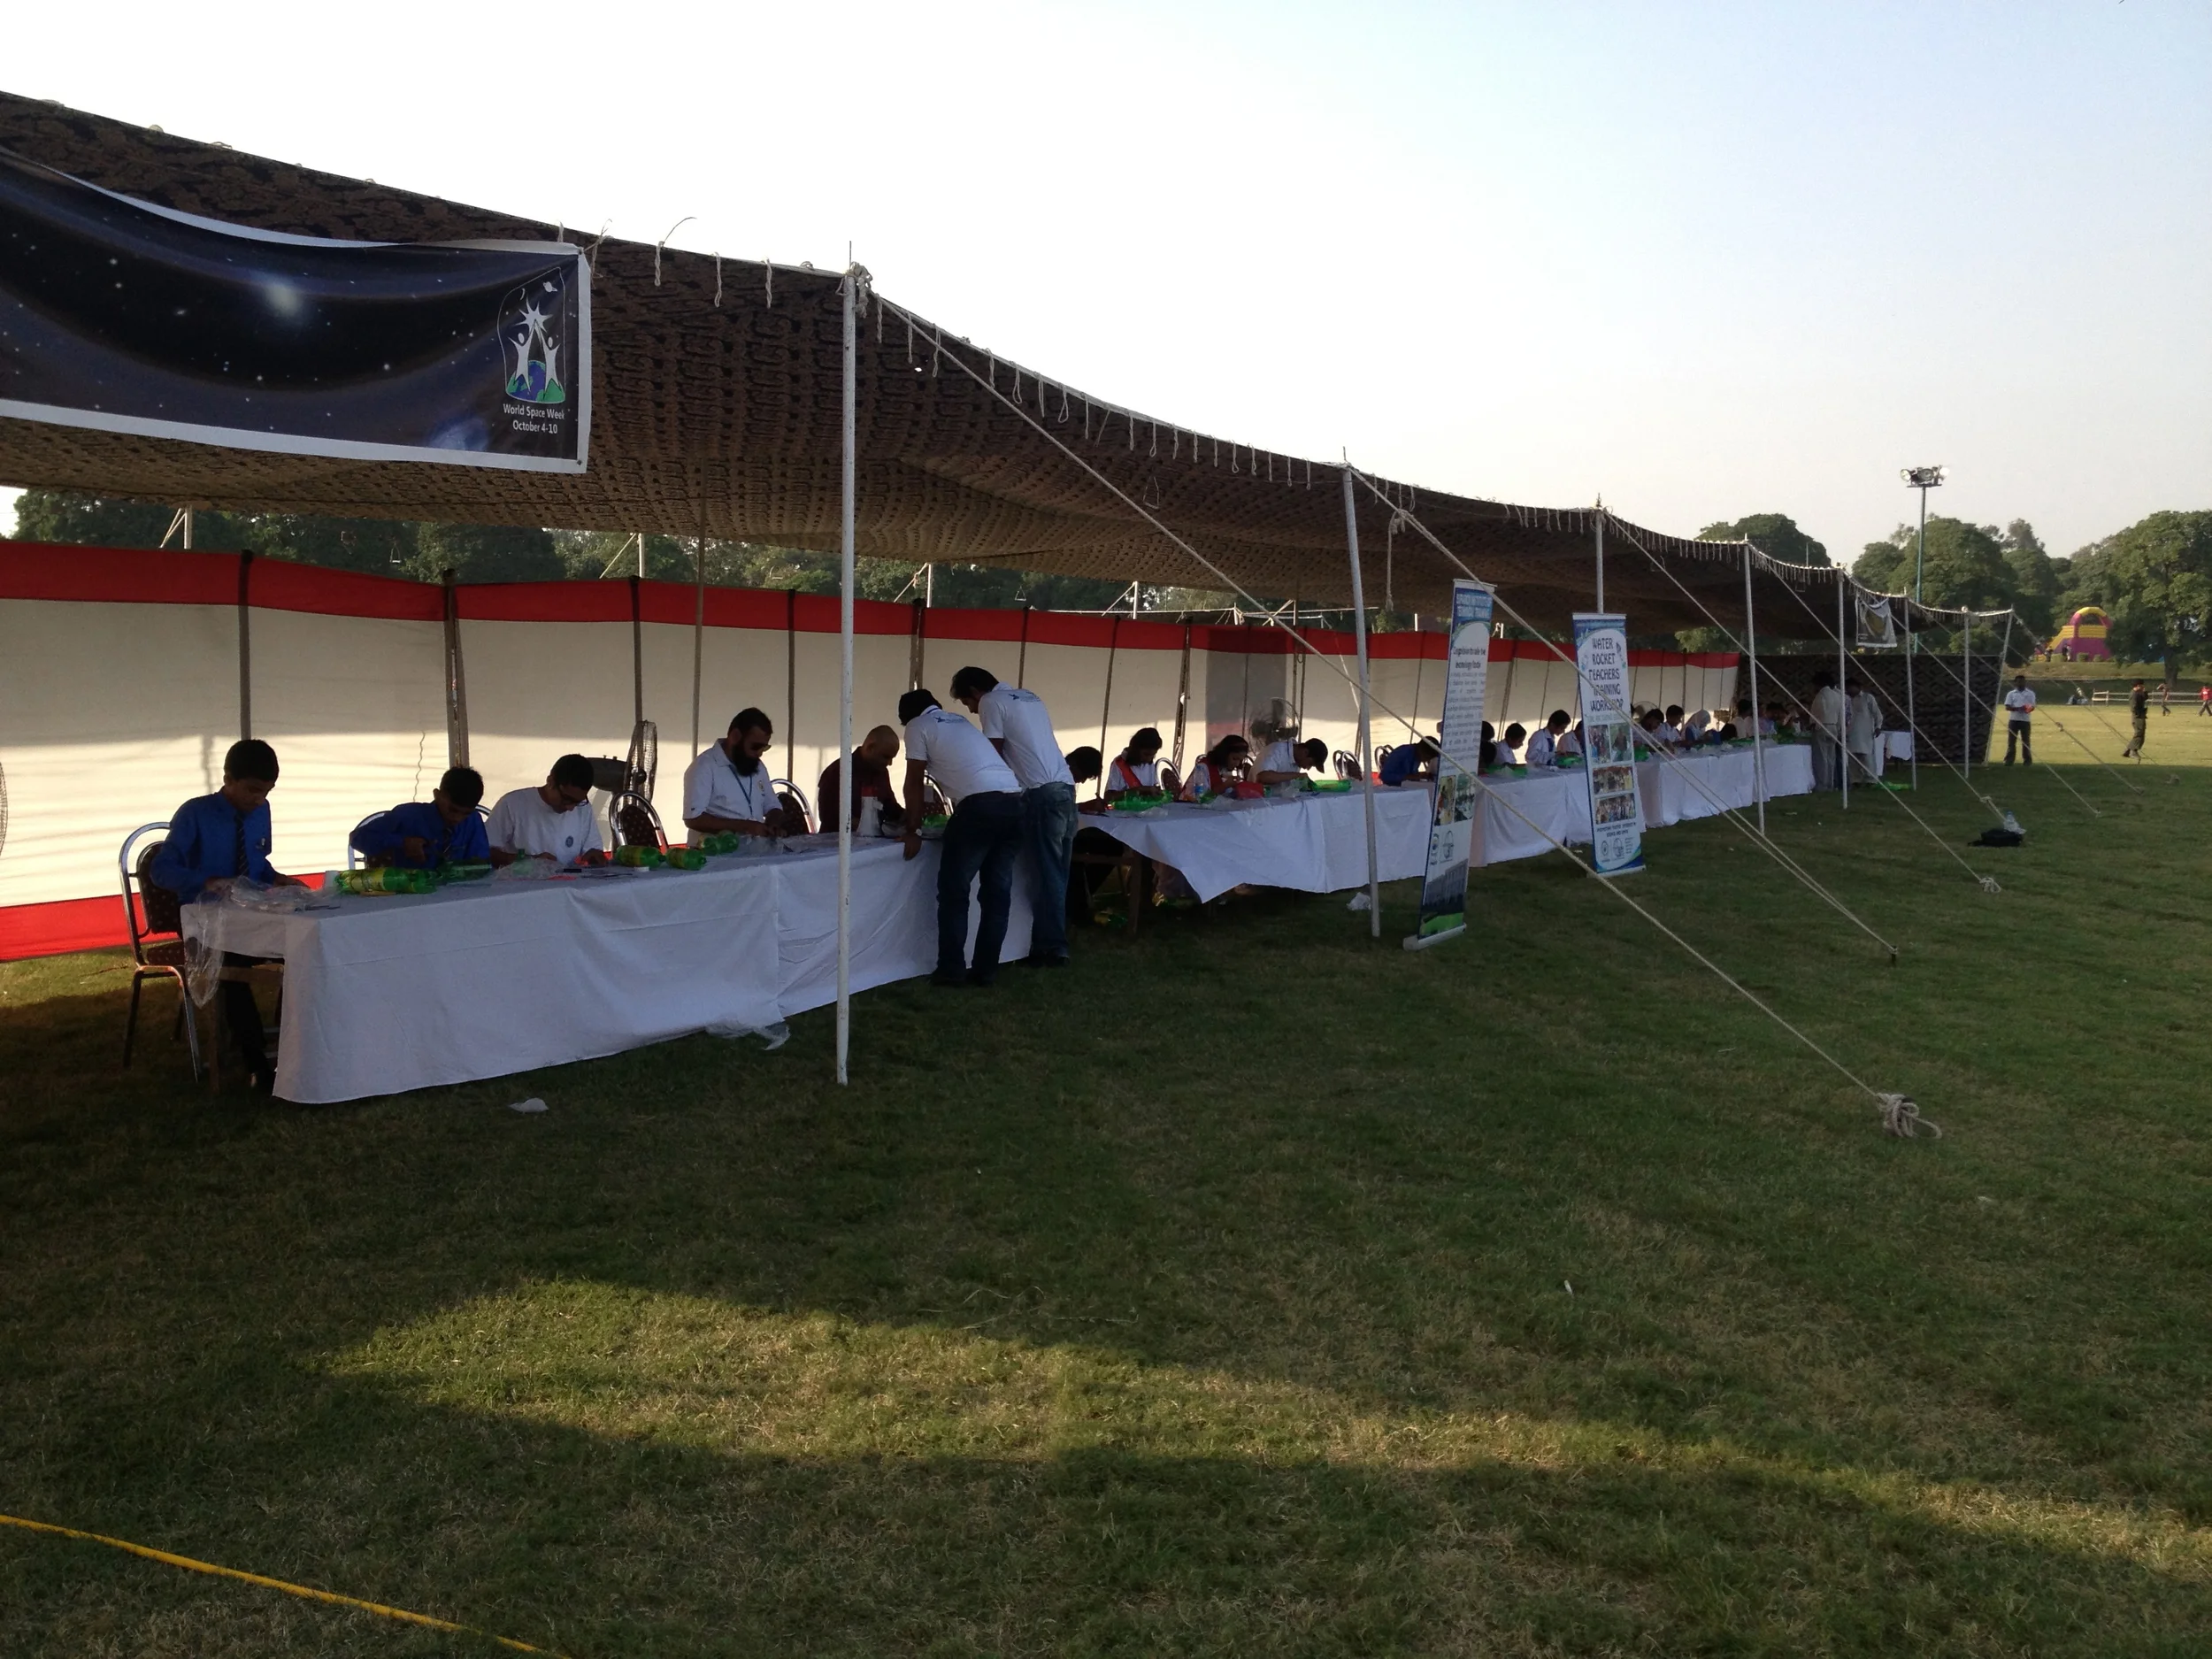
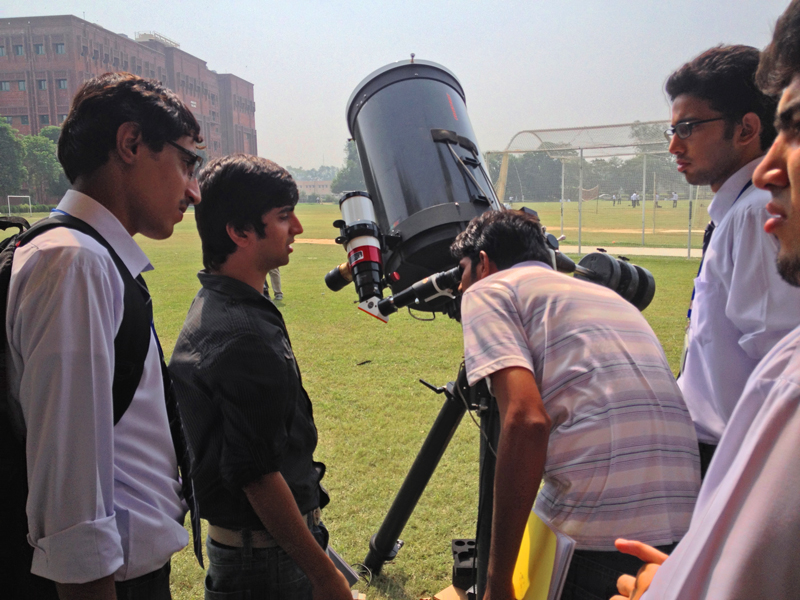
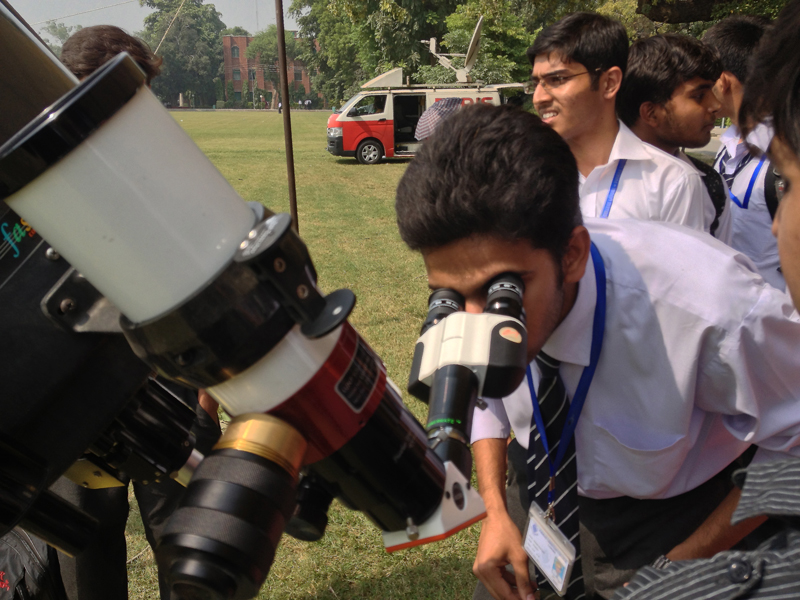
This afternoon Suparco and Khwarizmi Science Society made a wonderful public event at Gulshan Iqbal Park, Lahore. Water propelled rockets were just great! Telescopes, Seismograph, crater mkaing material, lunar phases, satellites models, introduction to space movies and many posters were being presented to the public.
WOW.. what a sun gazing session it was! We had set three telescopes there, two with Solar filter on and one halpha solar telescope with a binoviewer at the eyepiece end.
For three hours, students and faculty members kept on coming to our telescopes and most of them saw the solar surface first time in their lives. I heard many many 'WOWs" during that time period. It was a hot day and i with many others were trying their best to fight off the heat with all our astro will.
We were asked all sorts of question about how the sun generates such massive energy and what does individual feature on the solar surface mean, which they all were watching through these telescopes.
I am very grateful for the media folks from Express Tv Channel, to have come there and recorded all the event and stayed there till the end. I am also very thankful to "Benade Physics Society" of FC College and specially their president Amina Saleem.
As always, the members of Lahore Astronomical Society always find time to arrange such events. Special Thanks to Maroof Mian, Ali Khan and Muhammad Ali.
9 AVI files, 5,000 frames each, AVIStack, Registax and Photoshop.

I am very grateful to all those who came this evening in our monthly meeting. It was also great to see so many students from Space Science Department.
Ali Khan, our head of ATM (Amateur Telescope Making) gave a thorough introduction of mirror making and then how to make a telescope. The grinding methods and polishing was beautifully explained by showing each step with the mirrors in hands. He also described some key terminologies and the advantages and disadvantages of various configurations of the mirror designs. Many attendees asked important questions of the procedure of grinding techniques and Ali, as he always does, came up with easy to understand words/examples that kept us hooked during his whole lecture. He was thanked with a big round of applause.
World Space Week will be very busy for us.. So many vanues were under discussion. FC college will probably be our first venue with solar observations both with white light solar filters and with Halpha dedicated solar telescopes.
And last but not least, we are definitely going to Thandiani, Abbottabad and the number of participants are growing so fast.. Perfect!
These are the pictures taken by our dear member Mudassir, who is always great with his camera.
Someone in Lunt mailing list showed me 'solar action'.. I was in search of a method to easily color the mono images from halpha telescope. This tool is really a blessing, though i only like to color tool, others seems worthless to me.
Following is the first attempt with 'solar action'.

There are unlimited ways to process an astronomical image. Every imager has his/her own taste for the 'pretty picture'.
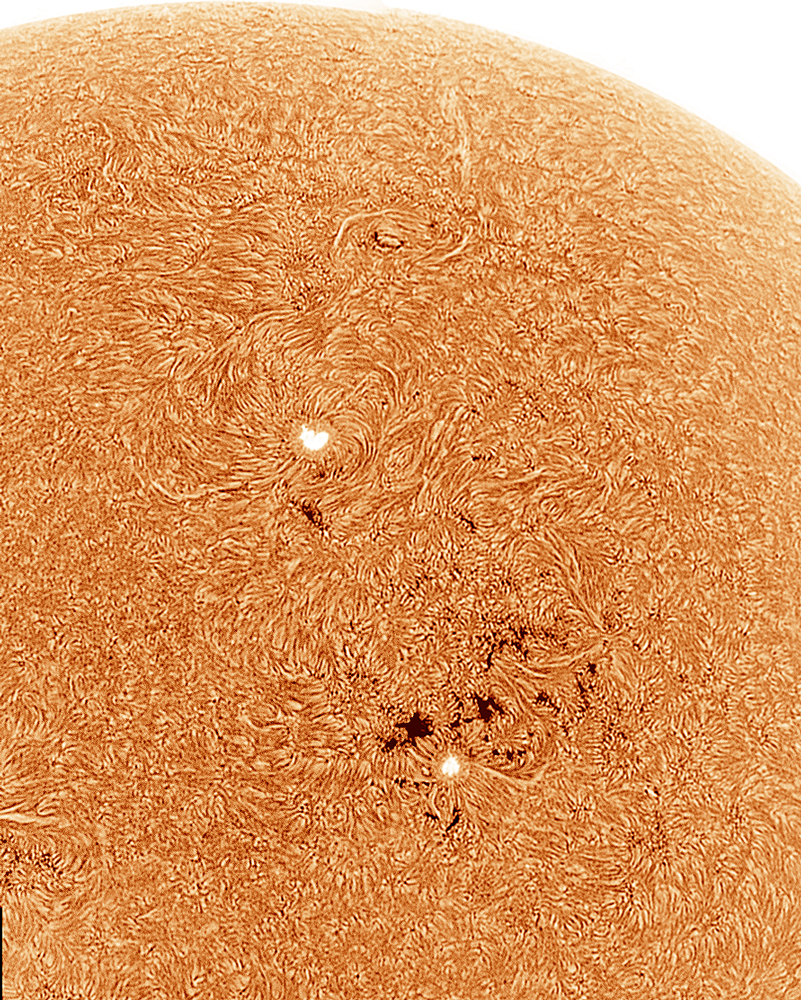
Some halpha imagers process by inverting the B/W image.. and then add colors to the image. It makes the filaments on the surface look like 3 dimensional.
I did just that with the following image and to me, it seems the 3D effect does appear with this processing technique.. what do you all think about it?